Learn how to make a Tetris cube puzzle inspired by Nintendo’s video game with this step-by-step tutorial.
Here’s a step-by-step project that teaches how to make a DIY Tetris puzzle cube inspired by Nintendo’s game of Tetris. Tetris is one of the most iconic video games ever made and one of my personal all-time favorites. I was a teenager when it was designed by Alexey Pajitnov in 1984.
The Game of Tetris:
The purpose of Tetris is to arrange a series of falling digital geometric shapes (tetrominoes) to construct solid horizontal lines without any gaps and clear them before the shapes stack up to the top of the screen. In the game of Tetris, there are seven original Tetrimino shapes: I, O, T, S, Z, L, and J. Each Tetrimino is made up of four connected square blocks arranged in different configurations. These shapes form the foundation of the game’s mechanics and strategy.
The goal is simple: rotate and place the pieces as they fall to fit them together as efficiently as possible before the stack reaches the top of the screen. In the game, the pieces can be rotated and moved, but cannot be flipped over (reflected). In other words, two of the shapes, “J” and “Z“, are reflections of another shape, “L” and “S,” respectively.
What are tetrominos, tetriminos, and tetracubes?
A tetromino is a 2D geometric shape composed of four equal-sized squares connected edge-to-edge. These shapes are a subset of polyminoes, which are figures formed by joining squares. Tetriminos is the name of tetrominoes in official Tetris contexts. A Tetracube is the 3D equivalent of a tetrimino.
Tetris Cube Puzzle Pieces:
For this easy DIY woodworking project, when you make one of the mirrored wooden 3D tetracube shapes, you make both because they are “free” rather than “fixed” or “one-sided.” (The tetrominoes are “one-sided” in the game of Tetris.) In other words, because you can easily manipulate and flip 3D Tetris blocks in your hands, the mirroring tetricube shapes don’t need to be made as separate pieces. However, you will need to make more than one of several tetracubes, and one extra piece, to solve this Tetris brain teaser puzzle.
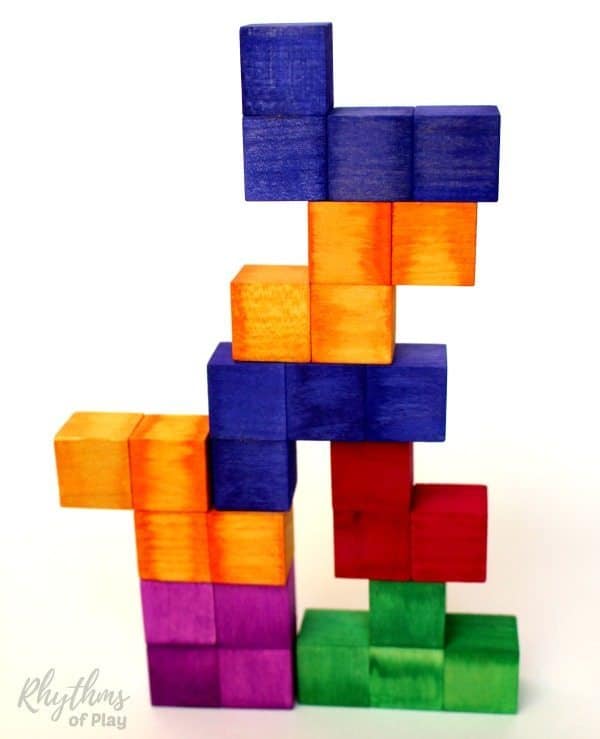
The puzzle is solved when you build a perfect cube, but there is more than one solution. To make one of the known solutions for the cube, you will need to create a total of at least seven pieces. To have at least two possible solutions, you only need to make one extra piece, for a total of eight pieces, but this means that one tetracube will always be left out. First published on December 8, 2015, this Tetris puzzle cube tutorial is regularly updated to keep the content fresh and current. You might also enjoy making a 3D Waldorf Square Puzzle. Scroll down for step-by-step assembly instructions.
Wooden 3D Tetris Puzzle Cube for Kids and Adults
This tutorial brings the magic of Tetris into the real world by building a Tetris cube puzzle using 1-inch square wooden blocks. Unlike the digital game, the goal here is to gather all the shapes into a perfect 3X3X3 cube! The ideal thing to tinker with on coffee tables and desks. Of course, you can use larger or smaller cubes, or more cubes, to assemble a larger or smaller DIY puzzle toy if you prefer. Read on to learn more bout this easy DIY woodworking project for kids and adults. You may also enjoy these DIY Building Blocks for Kids.
Whether you’re a fan of retro games or love hands-on woodworking projects, this tutorial will guide you through creating your own wooden 3D Tetris puzzle from scratch. Both kids and adults will enjoy making and playing with this Tetris-inspired wooden puzzle cube. It encourages 3-dimensional thinking and inner flexibility.
Anyone can exercise their geometric and spatial thinking by experimenting with this puzzle’s pieces. A fun and brain-teasing challenge that makes a great gift, fidget toy, desk toy, or handmade brain teaser. Only one shape in this 3X3X3 puzzle cube is not one of the original shapes included in the game by Nintendo. And one of the original shapes is not used at all to make a 3X3X3 cube. Can you guess which ones?
How to Make a Tetris Cube Puzzle:
There are two different ways to build a cube with Tetris pieces or tetracubes, but I needed to steal one of the pieces from my DIY Waldorf Square to do it. Allow me to explain:
When I was bored one day, I decided to try to build a Tetris cube by combining the shapes from the wooden Tetris-inspired puzzle I designed and photographed for the Fireflies & Mudpies blog. My goal was to use only Tetris shapes to complete the cube. However, in both solutions I discovered, I had to incorporate one of the puzzle’s pieces from the Waldorf Square to create a perfect cube. If I were to include more of the Waldorf square pieces in the mix, many more solutions would become possible. However, I wouldn’t necessarily be using tetricubes to solve it.
Make Pieces for a 3X3X3-inch or 4X4X4-inch Tetris Cube:
You can also use the instructions below to make a larger 4X4X4-inch puzzle cube, eliminating the need for the 3-cube right-angle corner piece from the other DIY 3D puzzle I used to solve the puzzle. Making a Tetris cube this size also makes it possible to use the “I” shape that is not used at all in the 3-inch Tetris cube solution. (A four-inch block doesn’t fit in a 3-inch cube, no matter how you flip it.)
Creating a Tetris cube of this size will increase the number of pieces or tetricubes you need to make. It will also increase the potential solutions and make it much more challenging to solve. I recommend starting with the 3X3X3-inch cube below.
If you enjoy the project and want to make a more challenging Tetris puzzle cube to play with and solve, come back to create a few straight “I” shapes, along with a few more of the other tetromino shapes, to build and solve a 4X4X4-inch Tetris cube! You can see an example of a 4X4X4-inch Tetris cube made with a 3D printer on Instructables.
DIY Tetris Cube Puzzle Materials:
- 1-inch wooden cubes (you can also use foam cubes or another type of material)
- Liquid watercolor paints or acrylic paint
- Tongs
- 8-ounce mason jars or a paintbrush
- Craft glue, wood glue, or hot glue
- I preferred using craft glue over hot glue to make the DIY Tetris cube in the photographs.
- I found it easier to get the cubes tight and flush because the glue does not dry as fast as hot glue.
- Wood glue would also work well for this project.
- Paper towels, waxed paper, or an old towel
- Mod Podge or another varnish to seal and protect (optional)
- Foam brush (optional for applying Mod Podge or another sealant)
Update 2025: I originally used Sax Liquid watercolors to make the set of tetricubes shown in the photographs for this DIY tutorial. Today, there are several other types of liquid watercolor paints you can use to make them, but the colors and their names may be slightly different from those shown in the photographs for this DIY woodworking tutorial. Alternatively, you can use acrylic paints to color the wooden blocks for this DIY Tetris puzzle project. Liquid watercolors allow the wood grain to show through, as shown in the photograph below, while acrylic paint does not.
DIY Tetris-Inspired Puzzle Cube Step-by-step Instructions:
Making this cube is easy and fun! You are welcome to make THIS Tetris-inspired puzzle and this DIY Waldorf Square to have all the pieces you need to make this cube and more, or follow the directions below to make the pieces just for this cube.
1. Color Wooden Cube Blocks:
- I originally used Sax Liquid watercolors to make the set of tetricubes shown in the photographs for this DIY tutorial. Today, there are several other types of liquid watercolor paints you can use. Choose the brand you like best.
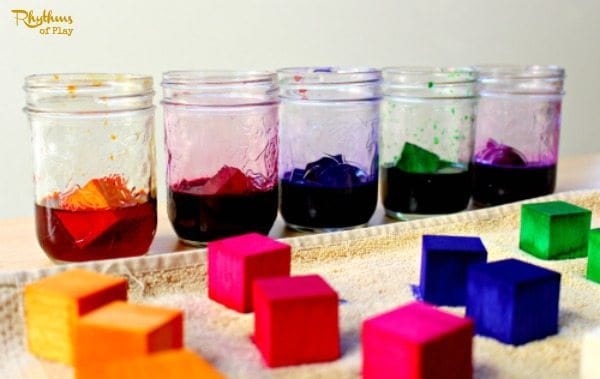
- Either pour a small amount of liquid watercolor paints into canning jars (as shown in the photograph below) or another bowl or recycled container.
- Then use tongs to drop the blocks into the liquid watercolor paints for a few minutes to color each block, or paint them with a paintbrush before gluing the tetricube shapes together in the next step.
- Alternatively, you can paint the blocks with acrylic paint before or after making them into the tetricube shapes. Please allow the paint to dry completely before gluing them together if you choose this option.
- Place the colored wooden blocks on waxed paper, paper towels, or an old towel to dry. Waxed paper is best for acrylic paint, while a towel is best for liquid watercolor paints, but it can absorb some of the color.
- An old DIY wooden block coloring tutorial I wrote explains how I colored the blocks and compares the colors I used with another brand of liquid watercolor paints in DIY Rainbow Colored Wooden Blocks. Feel free to check it out to learn more about coloring blocks.
2. Glue Tetris Blocks together for Cube Puzzle:
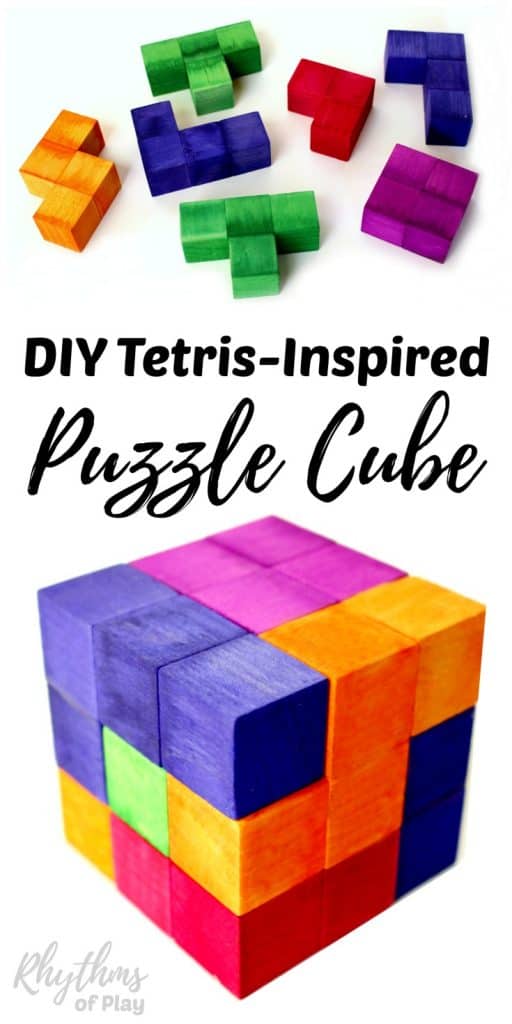
- Glue the wooden blocks together into the seven shapes shown in one of the two photos below.
- Each shape consists of four 1-inch wooden blocks or cubes glued together to form a tetromino shape, except for one puzzle piece made of three cubes.
- In other words, one non-tetromino 3-block piece in the shape of a right angle is required to complete the cube, in addition to the six tetracubes, for a total of seven blocks.
- Make sure to press the blocks together firmly and lay them down to make sure they are tight and flush before moving on to the next shape.
- If any of the shapes are slightly off, putting the wooden Tetris cube together will be challenging.
- The photograph and instructions below share the two sets of tetrimino shape combinations I used to build the cube, or solve the puzzle:

The colors and wooden cube combinations to make each set of tetracubes are as follows:
One key difference between the original digital game of Tetris and constructing a 3D Tetris cube puzzle is that the pieces are free, allowing them to be flipped or reflected to build the cube. In other words, for this project, both “L” and “J” are the same, and both “S” and “Z” are the same because they can be manipulated and used in the same way.
The “L” and “S” can easily be flipped to create the opposing tetracube shapes “J” and “Z” when needed. You are welcome to use different colors for each piece than those shown in the photograph and mentioned below, if you prefer. Building a 3-inch 3D Tetris cube requires a total of seven pieces as follows:
Solution 1 (photo on left above):
- “O” Square shape = Red-violet (One puzzle piece made with four blocks.)
- “S or Z” shape = Yellow-orange (Two puzzle pieces made with four blocks each.)
- “L or J” shape = Blue-violet (Two puzzle pieces made with four blocks each.)
- “T” shape = Yellow-green (One puzzle piece made with four blocks.)
- Right-angle corner shape = Coral (One puzzle piece made with 3 Blocks.)
Solution 2 (Photo on right above):
- “O” (Square shape) = Red-violet (One puzzle piece made with four blocks.)
- “S or Z” shape = Yellow-orange (One puzzle piece made with four blocks.)
- “L or J” shape = Blue-violet (Two puzzle pieces made with four blocks each.)
- “T” shape = Yellow-green (Two puzzle pieces made with four blocks each.)
- Right-angle corner shape = Coral (One puzzle piece made with 3 Blocks.)
3. Seal and Protect Tetris-Inspired Puzzle Cube Blocks (optional):
- Use a foam brush to paint the wooden terimino shapes with Mod Podge (optional).
- This will seal and protect the wood and help maintain the color.
3D Tetris Brainteaser Cube Puzzle:
Congratulations! You’ve created your own 3D Tetris cube puzzle with simple wooden blocks and a touch of craftsmanship. By working with a few of the classic tetromino shapes, you’ve transformed a fast-paced digital game into a tactile, thought-provoking brain teaser that pays tribute to one of the most beloved video games in history.
Whether you leave it natural or paint the blocks in bright Tetris-inspired colors, this handcrafted puzzle is sure to impress friends and family. A handmade Tetris cube makes a perfect homemade gift, classroom activity, or conversation starter for your coffee table. You can use it to create patterns, as a puzzle, and as building blocks or stacking toys. Both kids and adults can exercise their geometric and spatial thinking by playing with this puzzle’s pieces.


Hi there,
About how long does it take for the paint to dry when dying the wooden cubes?
Thanks!
Good question Jody. I can not remember an exact time, but I remember it being pretty quick. I would say to give it a few hours before you try to glue them together,but overnight would be best. Use a craft glue instead of a glue gun, it’s easier to get the pieces flush if you work with glue that doesn’t dry instantly. I pressed each side against a table to get them lined up right. I hope that helps!
Hi, The solutions for the cube puzzle are not showing up. Unfortunately this page has an enormous amount of ads that never stop loading. Maybe that has something to with it. Can you please send the solutions to me? Thank you, Hannah
Hi Hannah, I am sorry that you are having trouble, but I do not understand what solutions you are looking for?? This is a tutorial to make a Tetris-inspired puzzle cube. What can I help you with? The ads on this website allow me to keep my website free for you and my readers. Thank you for your understanding.
Hi, do you have directions how to stack the cubes after they are painted and glued in order to form the cube? Thanks!!
Hi Katie, There are a few ways to solve this Tetris-inspired wooden puzzle. When I update the post I will add in some solution pictures.
Regrettably, this is a issue that takes place more regularly than you’d believe.
Hi! I made these but have absolutely no clue how to assemble the pieces into the cube. I try going off the picture but that doesn’t help much. I don’t dare give it to my little cousins before knowing the solution haha!
If you could include step by step picture instructions of you adding the pieces 1 by 1 to complete the assembly it would help wonders.
I guarantee a lot of people are having the same problem. Great page, such beautiful diy ideas and work! Thank you 🙂
Hi Lilly, thank you for the great suggestion! I have no idea why I don’t have a picture of the few ways we have found to solve this DIY Tetris puzzle. I will update the post with a few new photos that will help as soon as I can. Maybe your cousins have already found the solution? Good luck, and thanks for letting me know how to make this DIY Tetris project tutorial even better!
Nell